
General Assist Technical Reference
High Wall Split System - Error Memory
How to retrieve the last recorded fault from the indoor unit
Applicable to compatible high wall split systems with indicator lamps and a MANUAL AUTO button
Quick answer: Disconnect power, reconnect it, then place the system into test run within approximately two minutes. The indoor unit will display the last memorised error using its indicator lamps.
Safety: Electrical isolation and diagnostic work must be completed by appropriately qualified personnel. Test run is intended for service and commissioning purposes.
1. Retrieve the last recorded error
| Step | Action | Important timing |
|---|---|---|
| 1 | Stop the air conditioner. | Confirm the unit is no longer operating. |
| 2 | Disconnect the power supply to the system. | For a full reset, leave power isolated for approximately 10-15 minutes. |
| 3 | Reconnect the power supply. | The error-memory access window begins when power is restored. |
| 4 | Within approximately two minutes, start test run using either the wireless remote controller or the indoor unit MANUAL AUTO button. | The available start-up period is approximately 2 minutes 20 seconds. |
| 5 | Read and record the indicator-lamp flash pattern shown on the indoor unit. | The memorised error is displayed for approximately five minutes before returning to the test-run pattern. |
| 6 | Press the ON/OFF button to stop and exit test run. | Do not leave the system operating in test run. |
2. Test run methods
Method A - Wireless remote controller
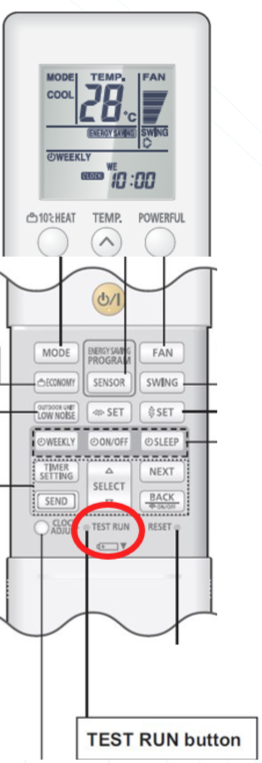
- Open the remote-controller cover.
- Locate the recessed TEST RUN button.
- Use a small non-metallic pointed object to press the button.
- Confirm the indoor unit enters test run and displays the memorised fault pattern.
Remote layouts vary. Some controllers may not have a dedicated TEST RUN button.
Method B - Indoor unit MANUAL AUTO button
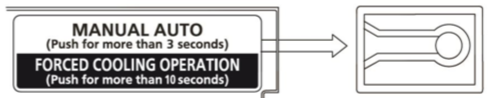
- Locate the MANUAL AUTO button behind or near the indoor unit's front panel.
- Press and hold the button for 10 seconds or more.
- Release the button when forced cooling/test run begins.
Holding MANUAL AUTO for more than three seconds generally starts manual auto operation. Continue holding for at least 10 seconds to initiate forced cooling/test run.
3. Understanding the lamp display
| Indoor indicator | Typical colour | Use during diagnosis |
|---|---|---|
| OPERATION | Green | Forms part of the memorised error-code flash sequence. |
| TIMER | Orange | Forms part of the memorised error-code flash sequence. |
| ECONOMY | Green | May illuminate or flash depending on the model and recorded fault. |
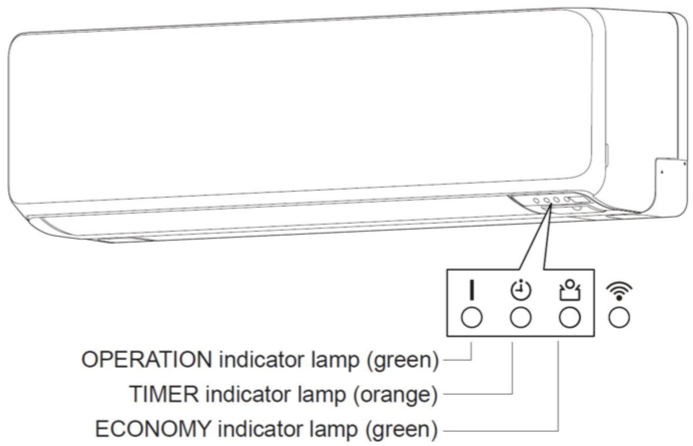

Record the complete sequence: Count the flashes of each lamp, note any pauses, and allow the pattern to repeat at least twice before determining the code.
No memorised error: If no previous fault is stored, the indoor unit will show the normal test-run indication instead. The OPERATION and TIMER lamps may blink together, depending on the model.
4. Erase the error memory
To manually clear the stored error:
- Retrieve the memorised error and wait until the error-memory pattern is being displayed.
- Press the indoor unit MANUAL AUTO button once while the error display is active.
- A short confirmation beep may sound for approximately three seconds.
Before erasing: Record the fault code and relevant site conditions. Clearing the memory before documenting the fault can remove useful diagnostic information.
5. If the error will not display
- Repeat the procedure and ensure test run is initiated within two minutes of restoring power.
- Confirm the MANUAL AUTO button was held continuously for at least 10 seconds.
- Confirm the wireless remote controller supports a dedicated TEST RUN function.
- Check whether power was interrupted after the original fault, as some models may not retain all error information indefinitely.
- Refer to the model-specific service manual to interpret the recorded lamp pattern.
Technical note: Button locations, lamp names and display behaviour can vary between indoor-unit series. Always confirm the procedure against the service documentation for the exact indoor model.