
General Assist Technical Reference
UTY-VSGXZ1 Signal Amplifier Address Setting
Manual address procedure using SW3, SW4 and SW7
For Fujitsu VRF signal amplifier networks
Each signal amplifier connected to the same VRF communication network must have its own address. The address is selected from A1 to A8 using the push switches on the signal amplifier controller PCB.
Important: Do not assign the same address to two signal amplifiers on the same network. Duplicate addresses can prevent correct communication and may cause intermittent or persistent network faults.
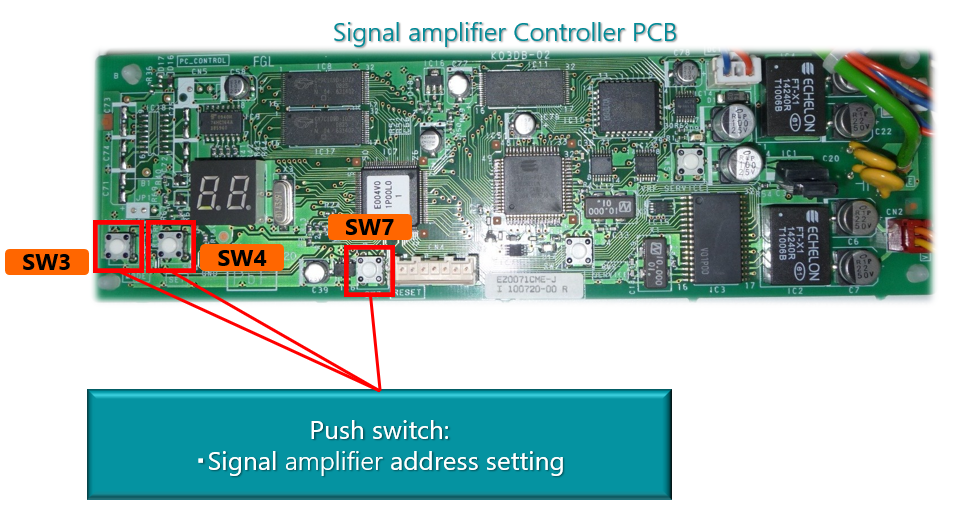
1. Switch identification
| Switch | Function during address setting |
|---|---|
| SW3 | Moves to the next address in the A1-A8 sequence. |
| SW4 | SET button. Used to enter the setting process, display the address and confirm the selected address. |
| SW7 | RESET button. Used with SW4 to enter address-setting mode and to return the board to normal operation. |
2. Manual address setting procedure
Step 1 - Power the signal amplifier
Confirm the signal amplifier is correctly connected and energised. The 7-segment display should illuminate.
Confirm the signal amplifier is correctly connected and energised. The 7-segment display should illuminate.
Step 2 - Enter address-setting mode
Press and hold SW4. While continuing to hold SW4, press and release SW7. Keep SW4 held until the address indication begins flashing.
Press and hold SW4. While continuing to hold SW4, press and release SW7. Keep SW4 held until the address indication begins flashing.
Step 3 - Display the current address
Press SW4. The display will show the current address, such as A.3.
Press SW4. The display will show the current address, such as A.3.
Step 4 - Select the required address
Press SW3 repeatedly to move through the available addresses: A1, A2, A3, A4, A5, A6, A7, A8, then back to A1.
Press SW3 repeatedly to move through the available addresses: A1, A2, A3, A4, A5, A6, A7, A8, then back to A1.
Step 5 - Confirm the address
When the required address is displayed, press SW4 to save the selection.
When the required address is displayed, press SW4 to save the selection.
Step 6 - Return to normal operation
Press SW7 once, or isolate and restore power to the signal amplifier. The display should return to its normal operating indication.
Press SW7 once, or isolate and restore power to the signal amplifier. The display should return to its normal operating indication.
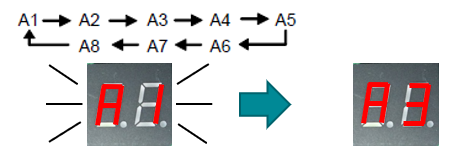
The dot in the display is part of the 7-segment indication. For example, A.3 represents address A3.
3. Verify the setting
- Allow the PCB to return to normal operation.
- Re-enter the address display process and confirm the saved address.
- Check every signal amplifier on the network and confirm each has a unique A1-A8 address.
- Confirm the VRF network completes normal communication without address or transmission errors.
4. Troubleshooting
| Issue | Check |
|---|---|
| Display does not illuminate | Confirm power supply, wiring, connectors and PCB protection devices. |
| Address does not flash | Repeat the entry sequence: hold SW4, press and release SW7, then continue holding SW4 until the display changes. |
| Address will not save | Confirm SW4 was pressed after selecting the required address, then reset the PCB and verify again. |
| Communication fault remains | Check for duplicate amplifier addresses, incorrect transmission wiring, reversed polarity, loose terminals or network segmentation issues. |
Do not assume A1 is an automatic address. Treat A1-A8 as selectable amplifier addresses unless the applicable design or installation manual specifically states otherwise for the system being commissioned.
Applicable product: UTY-VSGXZ1 signal amplifier. Addressing must be completed by suitably qualified personnel in accordance with the project wiring diagram and applicable installation documentation.