
Technical Service Reference
Intelligent Power Module Testing
IPM / TR PCB diode-test procedure and diagnostic interpretation
For qualified technicians diagnosing inverter compressor drive circuits
The Intelligent Power Module (IPM), also referred to as the TR PCB, switches and drives the compressor motor. This procedure checks the integrity of the module's internal transistors and diodes using a digital multimeter.
High-voltage hazard: Isolate all electrical supplies and fully discharge capacitors before testing. Failure to do so may cause electric shock, serious injury, or permanent PCB damage.
1. Testing conditions
- Power must be OFF and isolated.
- Discharge the DC bus capacitors and verify that stored voltage has reduced to a safe level.
- Disconnect all control harnesses and the compressor terminal harness U, V and W.
- Set a digital multimeter to Diode Test Mode.
Do not perform resistance or diode measurements on an energised circuit. Do not reconnect the compressor until all measurements and inspections are complete.
2. Test procedure
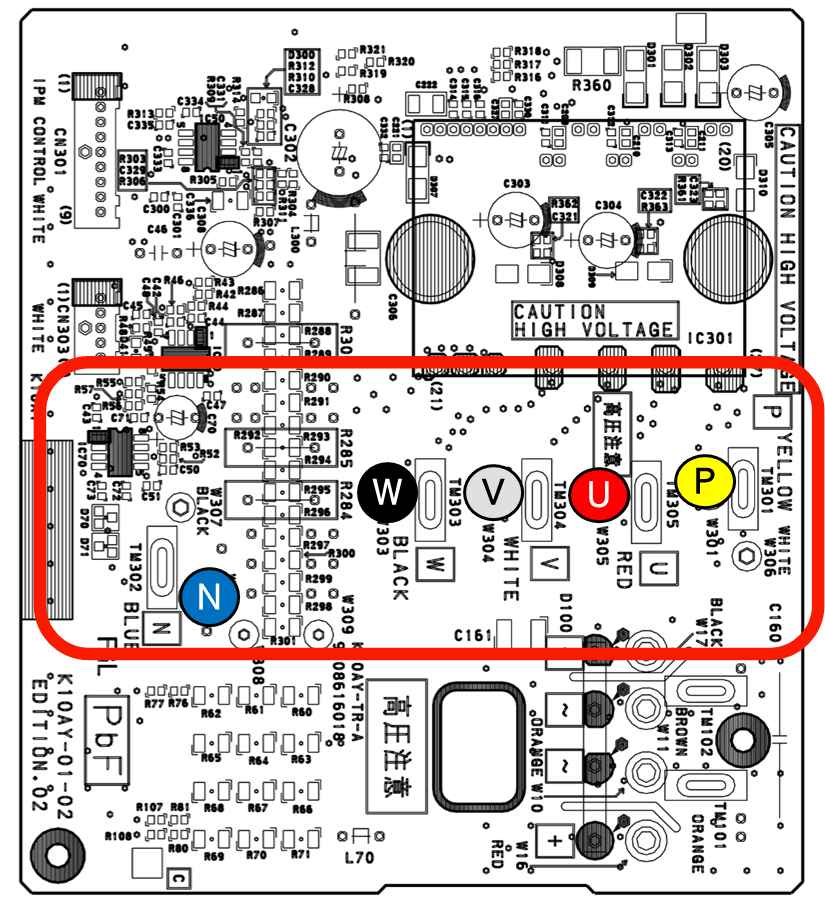
Identify the IPM terminals
| Terminal | Function |
|---|---|
| U, V, W | Compressor output phases |
| P | Positive DC bus |
| N | Negative DC bus |
| 1 | Positive bus test: Place the black lead on P. Place the red lead on U, V and W one at a time. Each reading should be approximately 0.4 V. |
| 2 | Negative bus test: Place the red lead on N. Place the black lead on U, V and W one at a time. Each reading should be approximately 0.4 V. |
| 3 | DC bus test: Black lead on P and red lead on N should read 0.7-0.9 V. |
| 4 | Reverse DC bus test: Black lead on N and red lead on P should show open circuit (O/L). |
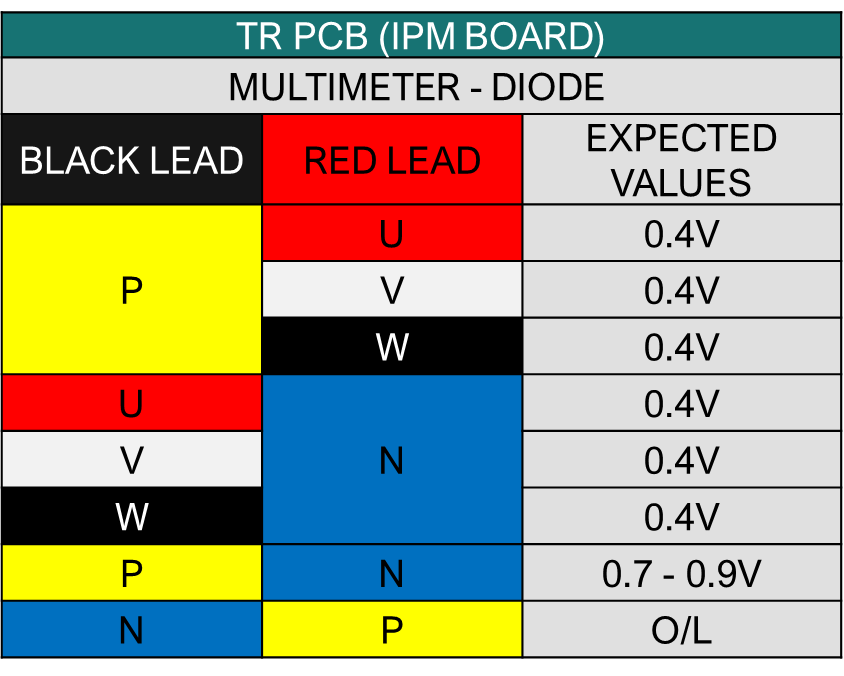
3. Reference values
| Black lead | Red lead | Expected value |
|---|---|---|
| P | U | Approx. 0.4 V |
| P | V | Approx. 0.4 V |
| P | W | Approx. 0.4 V |
| U | N | Approx. 0.4 V |
| V | N | Approx. 0.4 V |
| W | N | Approx. 0.4 V |
| P | N | 0.7-0.9 V |
| N | P | O/L |
4. Diagnosis and interpretation
| Observation | Likely diagnosis | Recommended action |
|---|---|---|
| Readings within specification | IPM diode paths appear normal | Continue diagnosis of the compressor, power supply and control circuits as required |
| 0 V across all measurements | IPM short circuit | Replace the IPM board |
| O/L on all readings | Internal transistor or diode path open | Replace the IPM board |
| Low or inconsistent readings | Partial short, leakage, or damaged junction | Replace the IPM board |
| Fuse or circuit breaker trips during power-up | Internal IPM fault or DC bus short | Inspect the power board and DC bus before replacing the IPM |
5. Technical notes
- Confirm the ACTPM and power supply boards are functioning correctly before replacing the IPM.
- Inspect the compressor windings and terminals for earth leakage, phase-to-phase imbalance, or signs of heat damage.
- When replacing the IPM, apply fresh thermal compound evenly between the module and heat sink.
- Ensure all electrical connectors are clean, tight, correctly seated, and free from moisture or corrosion.
6. Board diagrams
Service reminder: Always follow the applicable model service manual and wiring diagram. Component layout and expected readings may vary between inverter platforms.