
myanywAiR NEXT Setup Instructions
Before you start
| 1 | Confirm the air conditioner is compatible with myanywAiR NEXT and that the supplied USB device is available. |
| 2 | Connect your phone or tablet to the home Wi-Fi network that will be used by the air conditioner. |
| 3 | Have the air conditioner's wireless remote controller nearby. |
| 4 | Allow the app to access Bluetooth, the camera, local network and location services when requested. The permissions shown may vary by phone. |
Setup instructions
Step 1 - Download the app and create an account
- Search for myanywAiR NEXT in the Apple App Store or Google Play Store.
- Download and open the app.
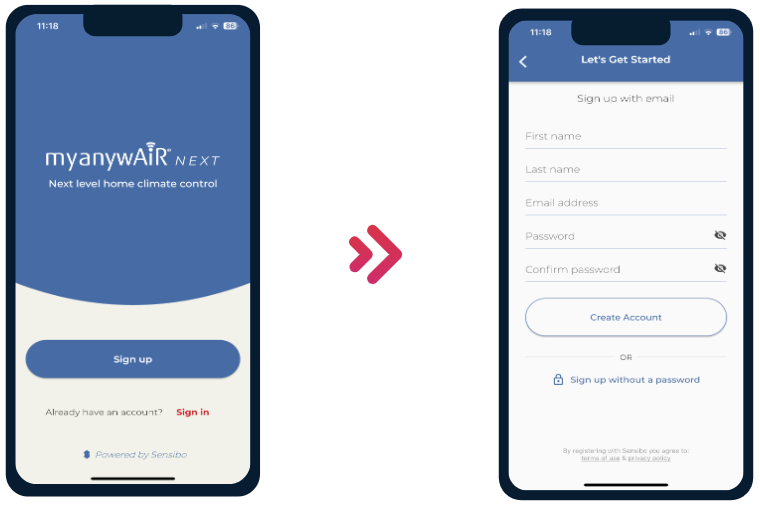
- Tap Sign up and enter your name, email address and password.
- Existing users can select Sign in.
Step 2 - Retrieve the USB device from the packaging
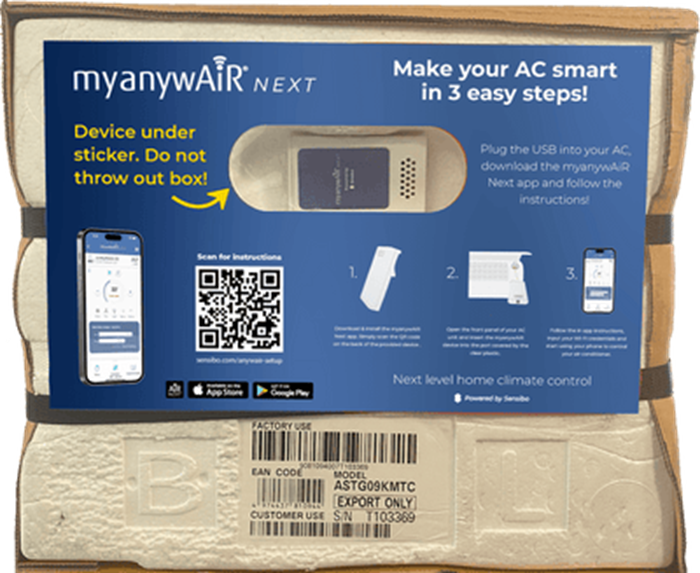
Check the handle area of the indoor unit carton for the blue myanywAiR NEXT sticker. The USB device is stored beneath the marked section of the sticker.
Step 3 - Add the device in the app
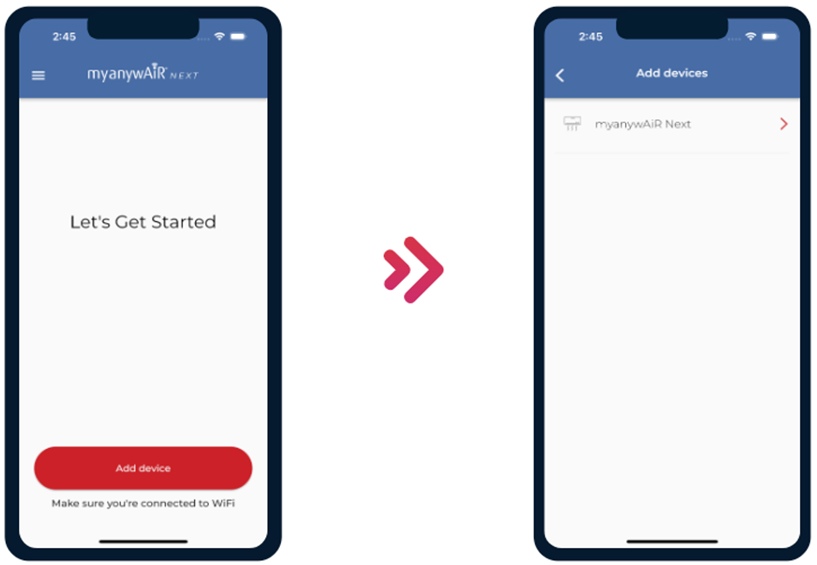
- From the app home screen, tap Add device.
- Select myanywAiR Next.
Step 4 - Insert the USB device into the air conditioner
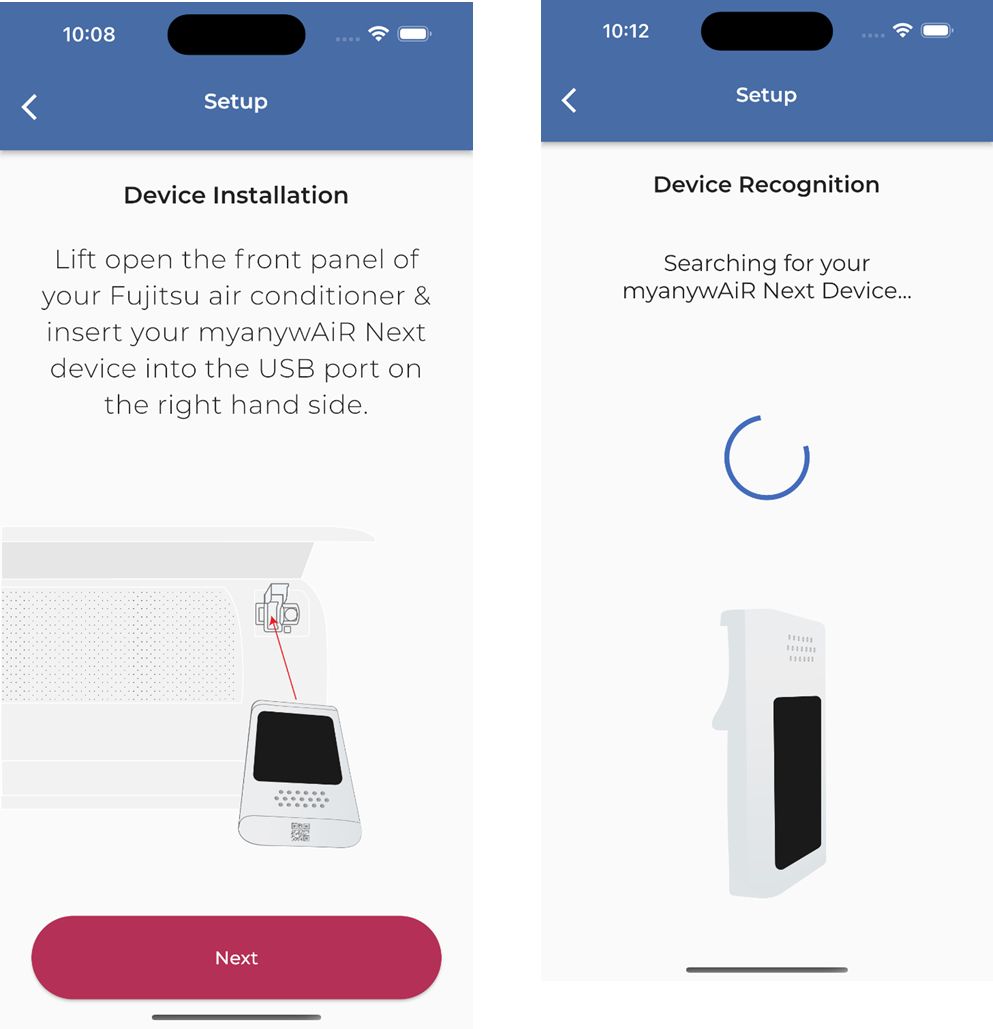
- Lift the indoor unit's front panel.
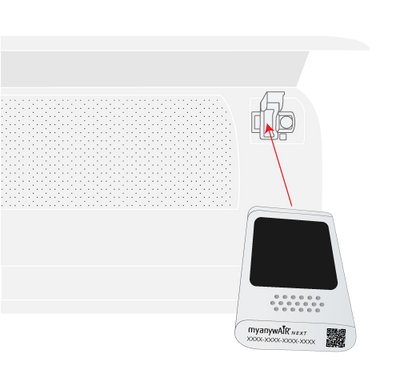
- Locate the USB port on the right-hand side.
- Insert the myanywAiR NEXT device fully and in the correct orientation.
- Close the front panel securely, then tap Next in the app.
Step 5 - Allow the app to recognise the device
The app will search for the inserted USB device. Keep the phone near the air conditioner while recognition is in progress.
Step 6 - Confirm with the wireless remote controller
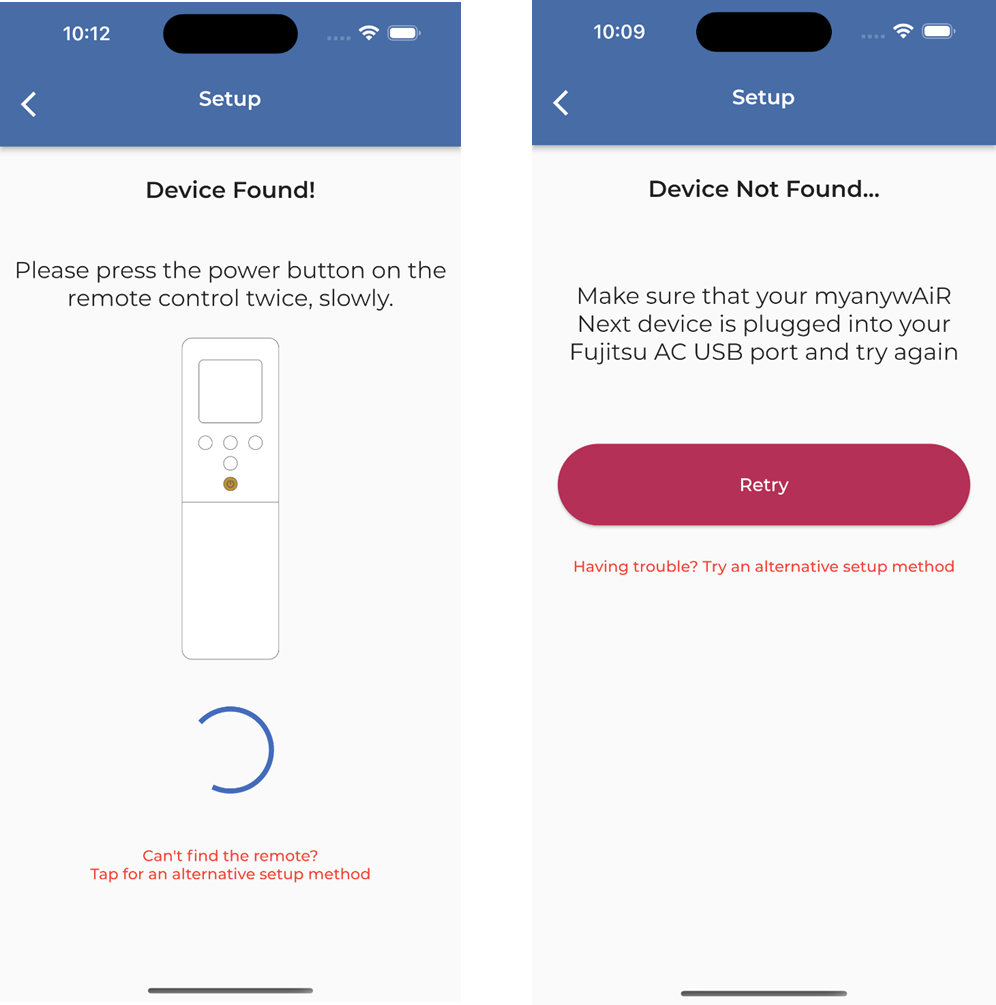
When the app displays Device Found, point the physical wireless remote controller towards the indoor unit and press the power button twice, slowly.
Step 7 - Complete the connection
Continue through the remaining prompts to connect the device to the home Wi-Fi network and assign a name or room. Once setup is complete, the air conditioner will appear in the app.
Alternative setup using the QR code
Use the alternative method when the app cannot automatically detect the USB device.
- On the error screen, select Try an alternative setup method.
- Remove the USB device and locate the QR code and device code on its label.
- Tap Next.
- Scan the QR code with the phone's camera, or select Enter code manually.
- Reinsert the USB device into the air conditioner when instructed and continue through the setup prompts.
Troubleshooting
| Message or issue | What to check |
|---|---|
| Device Not Found | Confirm the USB device is fully inserted, the air conditioner has power and the phone is close to the indoor unit. Remove and reinsert the device, then tap Retry. |
| Setup Failed | Confirm the phone remains connected to the intended home Wi-Fi network and that the entered Wi-Fi password is correct. Restart the setup or use the alternative QR-code method. |
| QR code will not scan | Clean the label, improve lighting and hold the camera steady. Select Enter code manually if scanning remains unsuccessful. |
| App cannot continue | Check that Bluetooth, camera, local network and location permissions are enabled for the app. Close and reopen the app after changing permissions. |
| Remote confirmation not detected | Point the remote directly at the indoor unit and press the power button twice with a brief pause between presses. Confirm the remote batteries are serviceable. |
Step 2. Locate the myanywAiR NEXT USB Device
The USB device is included inside the handle area of your new Fujitsu AC’s packaging.
Look for the blue sticker that reads “Device under sticker – Do not throw out box.”
Peel back the sticker to access the USB stick.
? Important: Do not discard the packaging until you’ve retrieved the USB device.
Step 3. Insert the USB into Your AC Unit
Lift open the front panel of your Fujitsu air conditioner.
Locate the USB port on the right-hand side of the unit.
Insert the myanywAiR NEXT USB stick fully into the port.
Close the panel securely.
Step 4. Add and Configure the Device
Open the myanywAiR NEXT app.
Signup if you do not have an account
- or if you already have a myanywAir Next account press "Sign in"
Tap Add Device → select myanywAiR NEXT.
The app will begin searching for your device.
If your device is found:
You’ll be prompted to press the power button twice on your air conditioner’s remote control — slowly.
If not found:
Tap Retry, or choose “Try an alternative setup method.”
- Insert the USB (if not done areadly)
Step 6. Device Recognition and Confirmation
Once the device has been correctly detected:
The app will display “Device Found!”
Press the power button twice on the physical AC remote to confirm pairing.
When connected, the app will show your AC model and status.
If pairing fails, the app will display “Device Not Found” or “Setup Failed” — tap Retry to try again.
Step 7. Once the device is found, press the power button on your physical remote control twice, slowly. If the device is not found press "Retry"
Step 7. Start Controlling Your AC
Congratulations! Your setup is now complete.
You can now control your Fujitsu air conditioner directly from the myanywAiR NEXT app.
Features include:
Mode Control: Switch between Cool, Heat, Dry, Fan, and Auto.
Timer & Schedule: Automate start/stop times.
Energy Insights: Track energy usage and optimise performance.
Voice Integration: Compatible with Google Assistant, Alexa, and Apple Siri.
Air Quality Features: Enable Pure Boost, Optimus+, and Coil-Dry modes (where supported).
Alternative Setup (if required)
If the app cannot automatically detect your device:
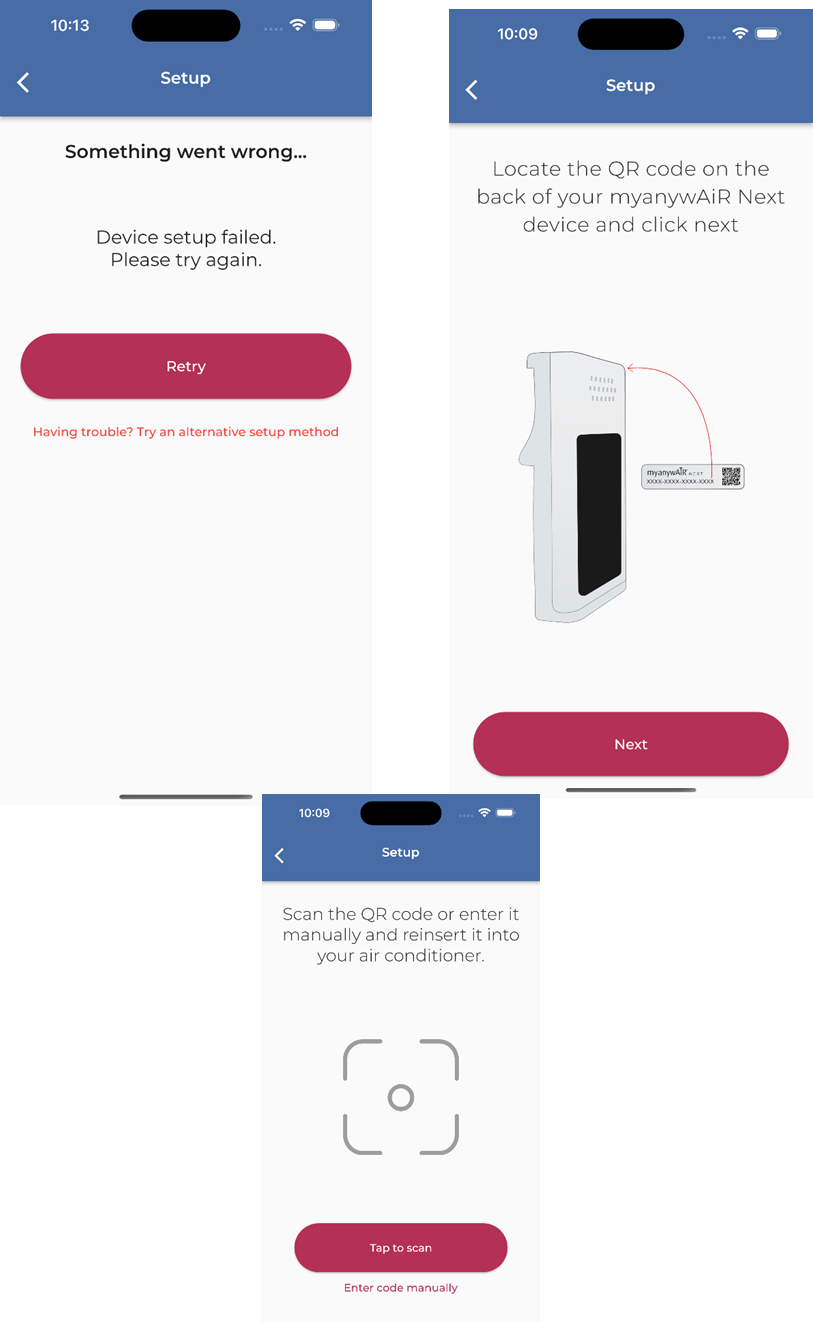
Locate the QR code on the back of the myanywAiR NEXT USB stick.
Tap Next and either:
Scan the QR code using your phone’s camera, or
Enter the code manually when prompted.
Reinsert the USB stick and continue setup.
Troubleshooting Tips
| Issue | Possible Cause | Solution |
|---|---|---|
| Device not found | USB not fully inserted or no power | Remove and reinsert USB firmly, ensure AC is powered ON |
| Setup failed | Weak Wi-Fi connection | Move router closer or use 2.4GHz network |
| QR code unreadable | Damaged or missing label | Tap Enter code manually in the app |
| App not connecting | Location permissions disabled | Enable Bluetooth & location access in phone settings |
Ready to Go
You can now manage temperature, fan speed, and swing settings directly from your smartphone — even when you’re away from home.
The myanywAiR NEXT system provides next-level home climate control with flexibility, convenience, and efficiency.