
J Series Address Setting
The address on a J Series indoor unit is set using the wireless controller. This article explains how to enter address-setting mode, select the correct custom code, assign an address to each indoor unit and confirm the setting.
Important
Each indoor unit on the system must have a different address. The address range shown in the source procedure is 00 to 07. After all addresses have been set, the power must be reset or the addresses may not be read correctly.
Each indoor unit on the system must have a different address. The address range shown in the source procedure is 00 to 07. After all addresses have been set, the power must be reset or the addresses may not be read correctly.
1. Before You Start
- Use the wireless controller to complete the address-setting procedure.
- Confirm the indoor unit receiver is accessible so the MANUAL AUTO button can be operated.
- Make sure you know the custom code used by the system before assigning the address.
- Confirm the capacity switches on the indoor unit are set correctly.
- Plan the address allocation so each indoor unit has a unique address from 00 to 07.
Do not duplicate addresses
If multiple indoor units use the same address, system communication and identification problems may occur.
If multiple indoor units use the same address, system communication and identification problems may occur.
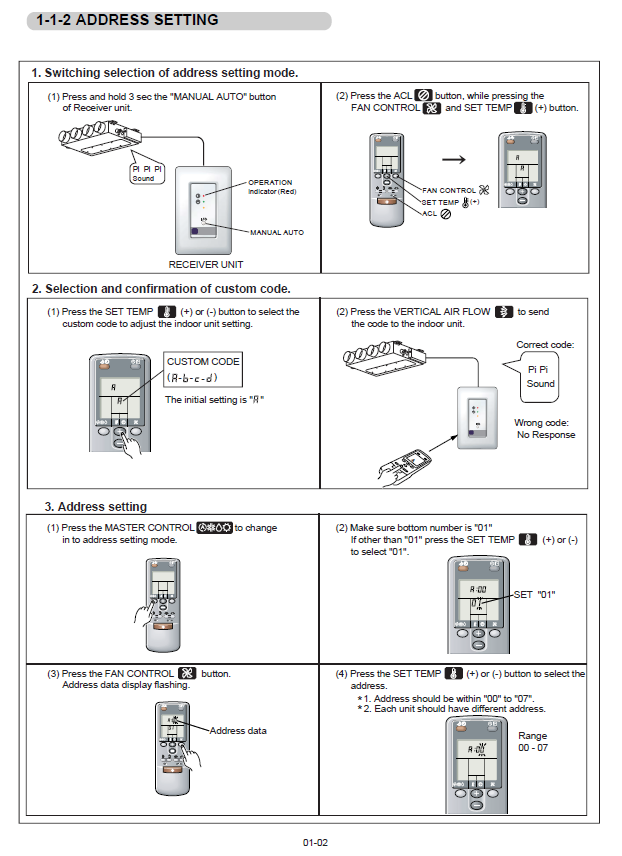
2. Enter Address Setting Mode
- Press and hold the MANUAL AUTO button on the receiver unit for 3 seconds.
- On the wireless controller, press the ACL button while pressing the FAN CONTROL and SET TEMP (+) buttons.
- This changes the controller to the address-setting selection mode.
3. Select and Confirm the Custom Code
The correct custom code must be selected before the indoor unit address can be adjusted.
| Step | Action |
| Select custom code | Press SET TEMP (+) or SET TEMP (-) to select the required custom code. The available codes shown are A / b / c / d. The initial setting is A. |
| Send code to indoor unit | Press VERTICAL AIR FLOW to send the selected code to the indoor unit. |
| Confirm response | If the code is correct, the indoor unit responds with a beep. If the code is wrong, there is no response. |
4. Set the Indoor Unit Address
- Press MASTER CONTROL to change into address-setting mode.
- Make sure the bottom number displayed is 01. If it is not, use SET TEMP (+) or SET TEMP (-) to select 01.
- Press the FAN CONTROL button. The address data display will start flashing.
- Use SET TEMP (+) or SET TEMP (-) to select the required address.
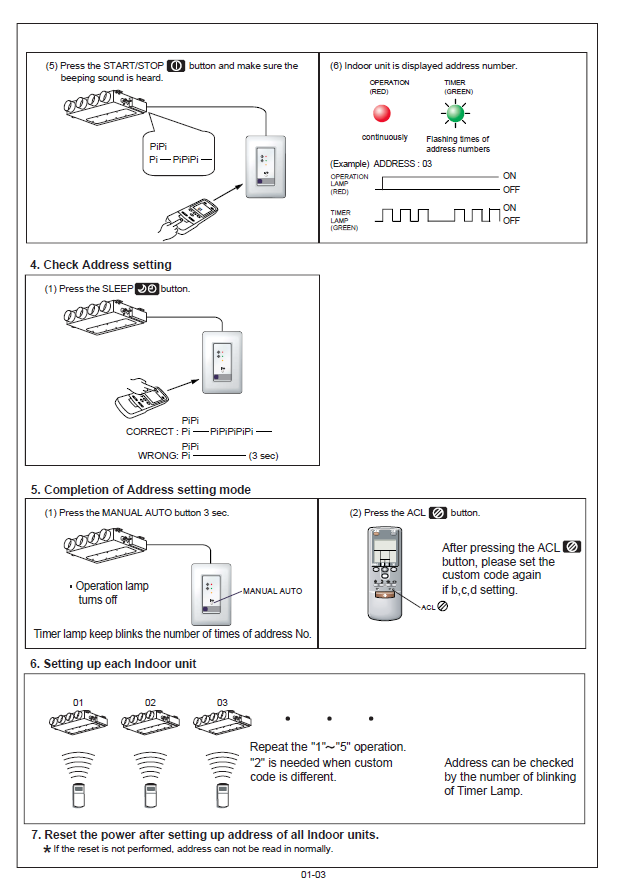
- Press START/STOP and make sure the confirmation beep is heard.
- The indoor unit will display the address number using the indicator lamps.
Address rules
- Selectable address range: 00 to 07.
- Each indoor unit must have a different address.
- The example shown in the source material uses address 03.
5. Confirm the Address
Press the SLEEP button to check the stored address setting.
| Indicator | Meaning |
| Operation lamp (red) | Lights continuously during the address display example shown. |
| Timer lamp (green) | Flashes the number of times equal to the stored address number. |
Example
If the indoor unit address is 03, the timer lamp flashes 3 times.
If the indoor unit address is 03, the timer lamp flashes 3 times.
6. Exit the Mode and Repeat for Other Units
- Press the MANUAL AUTO button for 3 seconds to complete the address-setting mode.
- Press the ACL button on the controller.
- If custom code b, c or d is used, set the custom code again after pressing ACL.
- Repeat the procedure for each indoor unit until all units have been assigned unique addresses.

7. Capacity Switch Check
Also ensure the capacity switches on the indoor unit are set correctly before finalising the system setup.
Final step
After all indoor unit addresses have been set, reset the power. If power is not reset, the address may not be read normally.
After all indoor unit addresses have been set, reset the power. If power is not reset, the address may not be read normally.
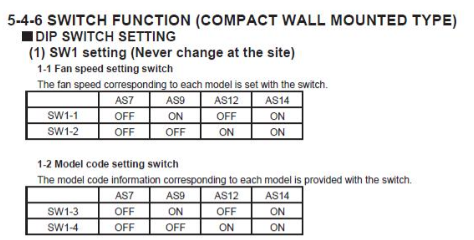
8. Compact Wall Models
For compact wall models, refer to the additional switch-setting reference below.
Technician Summary
- J Series indoor unit addresses are set through the wireless controller.
- Enter address-setting mode from the receiver unit using MANUAL AUTO, then use the wireless controller keys to proceed.
- Confirm the correct custom code before setting the address.
- Selectable addresses are 00 to 07.
- Each indoor unit must have a unique address.
- Check the stored address by the number of timer-lamp flashes.
- Confirm the capacity switches are correct.
- Reset power after all addresses are set.
Technical note: This procedure is based on the source J Series address-setting documentation. Always confirm the applicable installation or service manual for the exact indoor unit model being commissioned.