
General Assist Technical Reference
Motion Sensor and Time Clock on an External Input
Series and parallel dry-contact wiring logic
Example control arrangements for Fujitsu split and AIRSTAGE VRF indoor units
This guide explains how a motion sensor and time clock can be connected to an indoor unit external input. The wiring arrangement determines whether both devices or either device can command the unit to operate.
Qualified personnel only: External-input terminals and functions vary by indoor-unit model. Confirm the applicable installation manual, connector, input mode and permitted contact type before wiring. Do not apply voltage to an input specified for volt-free contacts.
1. Wiring concept
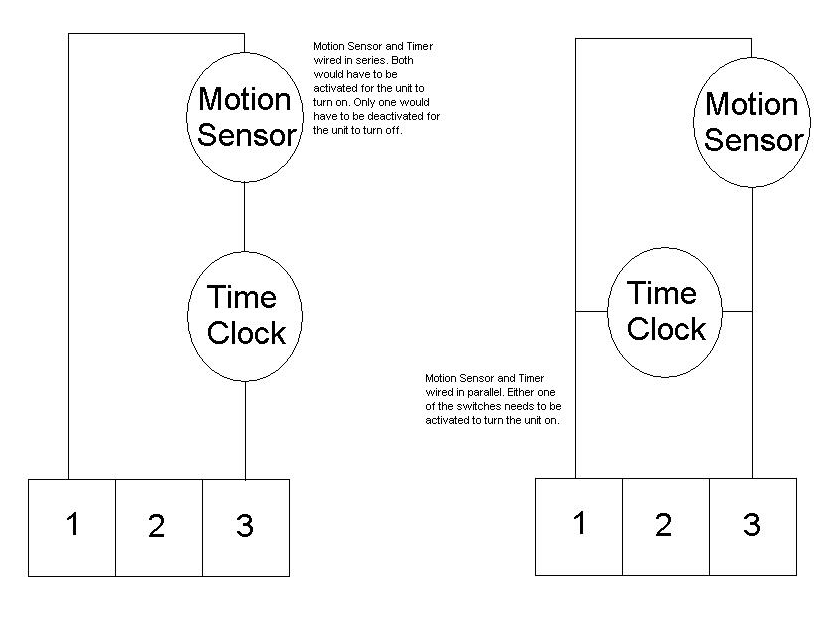
Left: series connection (AND logic). Right: parallel connection (OR logic).
Image note: Freshdesk does not support embedded Base64 images. Upload the supplied PNG to Freshdesk, insert it into the article, or replace the image source above with the hosted Freshdesk image URL.
2. Series configuration - AND logic
In a series configuration, the motion sensor and time clock contacts are connected one after the other. Both contacts must be closed before the external-input circuit is complete and the unit can receive an ON command.
Operating sequence
- The time clock must be within its programmed operating period.
- The motion sensor must detect occupancy and close its contact.
- If either contact opens, the external-input circuit opens and the unit is commanded OFF, subject to the selected input function.
| Motion Sensor | Time Clock | External Command |
|---|---|---|
| Active | ON | ON |
| Inactive | ON | OFF |
| Active | OFF | OFF |
| Inactive | OFF | OFF |
Typical application: An office system that is only permitted to operate during scheduled hours and while the area is occupied.
3. Parallel configuration - OR logic
In a parallel configuration, the motion sensor and time clock provide separate paths across the external input. Either contact can complete the circuit and command the unit ON.
Operating sequence
- The unit can be enabled by the programmed time-clock schedule.
- The unit can also be enabled when the motion sensor detects occupancy.
- The external-input circuit opens only when both contacts are open.
| Motion Sensor | Time Clock | External Command |
|---|---|---|
| Active | ON | ON |
| Inactive | ON | ON |
| Active | OFF | ON |
| Inactive | OFF | OFF |
Typical application: A retail area that normally operates to a time schedule but can also be enabled by detected occupancy outside the standard period.
4. Integration with Fujitsu systems
The combined contact is connected to the applicable external-input connector or terminal on the indoor-unit PCB. Depending on the model and configured function, a contact closure may provide forced ON/OFF, start/stop, occupancy control or another supported command.
| Item | Requirement |
|---|---|
| Contact type | Use the dry-contact or applied-voltage input specified by the model's installation manual. Do not assume all models use the same signal type. |
| Input connector | Common Fujitsu VRF indoor units may use connectors such as CN16, CN17, CN22, CN23, CN24 or CN27. Confirm the exact connector for the indoor-unit model. |
| Input function | Set the relevant function setting, DIP switch or controller parameter for the intended external command. |
| Field devices | Motion sensors, time clocks and BMS outputs must provide contacts with ratings suitable for the indoor PCB input circuit. |
Terminal numbering: The diagram numbers 1, 2 and 3 are conceptual only. They do not represent a universal Fujitsu terminal assignment. Always use the wiring diagram supplied with the specific indoor unit or interface.
5. Installation and commissioning checks
- Confirm the indoor-unit model and obtain the correct installation manual.
- Identify whether the external input requires a dry contact or an applied-voltage signal.
- Confirm the intended logic: series for AND operation or parallel for OR operation.
- Verify contact ratings and provide an interposing relay where required.
- Configure the indoor-unit external-input function before testing.
- Test every combination of motion-sensor and time-clock states.
- Confirm how the system responds following power restoration and after any programmed delay.
| Wiring Method | Logic | Unit Enabled When |
|---|---|---|
| Series | AND | Motion is detected and the time clock is ON. |
| Parallel | OR | Motion is detected or the time clock is ON. |
This article provides general control-logic guidance. The product installation manual and approved project wiring diagram take precedence.